Is your Nokia 1 device stuck at FRP lock screen and want to access your device again then you are on the right place to FRP Bypass Nokia 1 TA1066 easily with latest SP flash tool and Nokia TA1066 FRP File. we already published an article about unlocking FRP from your device, again we found another method for especially for Nokia 1 TA1066. so without wasting any time follow this process step by steps, to execute this method you need only a PC and this FRP files.
Note:- This Method is Only for Device Owner,
Make Sure:- We try this method only Nokia 1 TA1066, Please try this with your MTK version on Nokia TA1066 device, don’t try this other Nokia device.
Before you start to Bypass FRP first you need to download FRP Files and FRP tool and USB Drives, and this guide :-p.
How To Disable FRP Protection (Factory Reset Protection) on Android devices
First of all, the FRP lock feature will automatically enable added on your device when you added a Google (Gmail) account on Nokia 1. If you want to disable this feature then you need to delete the Gmail Account from device Settings. check the below process to delete Google Account from Nokia 1.
How to add Google Account on Nokia 1
First of all, go to settings menu=>> Accounts=>> Add an Account =>> Google
Enter your Google Account Information there.
Now How to Remove (Delete) Google Account on Nokia 1
First of all, go to settings menu=>> Accounts=>> Add an Account =>> Google
Now choose the Google (Gmail) Account
Then Find the remove icon from the top right corner.
Download FRP Files first
File Name-Nokia TA1066 FRP file
Download-Click Here to Download
Download-MTK USB Driver
Let’s Start to Unlock FRP Nokia TA1066
-First of all, Download all files on your Computer,
-Then extract Nokia 1 TA1066 Frp files on your computer.
-Once the FRP files extracting completed, then open the extracted folder.
-There you will see “2” files,
- SP Flash tool.zip
- FRP Files folder.
-Now extract the “SP Flash tool” on there.
-Once extracted, open the SPFlash tool extracted folder,
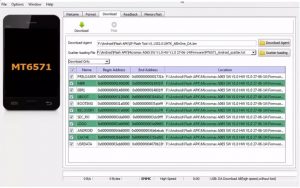
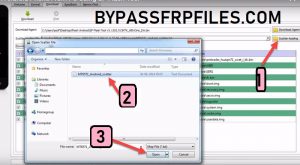
-Now find there “SP Flash Tool.exe”, Then run the “SP Flash tool.exe” from there.
-After that, Click on”Download Agent” tab, and give the file path of the ‘Download Agent” file (it should be in the flash tool folder) and then press “Open” button.
-Then click on the”Scatter-loading”, then give the file path of “MT6739M Scatter” file (File should be in the Flash file) folder and press the “Open”.
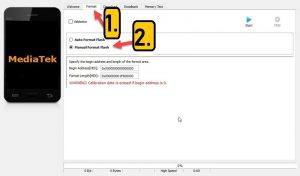
-Now go to the “Format” tab by click on the “Format” icon.
-Then check the “Manual Format” from there.
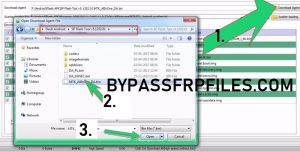
-Now open the “Nokia 1 TA1066 MTK Scatter.txt” file in notepad.
-Then press “CTRL+F” then find tab will appear,
-Now type there “Persist” and then hit enter.
-Once you get the search results, then copy format address. (Address must be matched with below Address).
,Bypass FRP Xiaomi 6A")
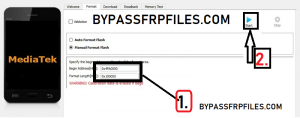
-Open FRP Format Address.
- 0x5A80000 => Begin Address field.
- 0x100000 > Format Length field,
-All files are now successfully selected, now you to format the FRP storage to FRP Bypass Nokia 1 TA1066 successfully.
Now FRP Bypass Nokia 1 TA1066
-After that, Install the MTK USB Driver on your PC.
-Then Open the “SP Flash Tool” and then click on the “Start” icon from there.
-Now Connect your Device.
- First Power Off your Device,
- Then connect your Nokia 1 to your computer using a good USB Cable,
-Then check on the “SP Flash Tool” a green line will appear,
-That’s mean your device flashing will be started.
Note:- If your Nokia 1 not detected on the SP Flash Tool, Then reinstall USB Driver and restart your PC and then follow the whole process once again.
-Once flashing finished, then you will get a pop-up window,
-Then disconnect and power on your device,
-Great, you have successfully Bypass FRP Nokia 1 TA1066.
Check Out here Some Other Methods
Thanks for visiting us, Comment below if you face any problem With FRP Bypass Nokia 1 TA1066| Nokia TA1066 FRP File, we will try to solve your problem as soon as possible. you can check other some tutorial here to help you.