FRP is the additional privacy protection feature for all modern-day Android smartphones, It protects phones from unauthorized access. After performing factory reset, If you forget the last active Gmail account which was used on your phone, then, you have to find a solution to unlock your phone. Here, more especially, I share a detailed process to Nokia 3 FRP Bypass | How to Unlock Nokia Google Verification – Android 9 (2020) successfully. So, follow the below process carefully.
Google has added the FRP feature on the latest Android versions (Lollipop 5.0, Marshmallow 6.0, Nougat 7.0, Oreo 8.0, Pie 9.0, 10 Q ). The abbreviation of factory reset protection is FRP and it basically protects Android users’ personal data and Privacy during thefts.
Once FRP is activated then it prevents any users to use the phone after the factory reset. However, FRP has turned On automatically when a user added a Gmail account on his phone for the very first time.
After performing a factory data reset, you have to log in with the same Google ID and password that you set up earlier on the device. In case, if your Nokia 3 stuck at the FRP lock verification screen, Then BYPASSFRPFILES.COM will give you an extraordinary way to bypass google account lock from your device.
The Nokia 3 FRP Unlock process is now available for free from here, Also you can use any compatible FRP bypass tool apk according to your phone to unlock FRP easily, and here I share the latest FRP Bypass process to bypass FRP lock from your device.
How To Disable FRP (Factory Reset Protection)
If you want to disable the FRP lock feature from your Samsung J3 then you need to delete the Gmail Account from the device Settings. follow the below process completely to disable the Factory Reset Protection successfully: go to the settings menu=>> Accounts=>> select the Gmail id =>> remove account =>> that’s it.
Nokia 3 Summary
Nokia 3 released in March 2018. It comes with 2GB of RAM and 16GB of ROM storage and its support up to 128GB of external memory support. The display of the Nokia 3 comes with 5.0inchs with a resolution of 720 x 1280pixels. Nokia 3 runs on Quad-core 1.4 GHz Cortex-A53 Mediatek MT6737 (28 nm) chipset and powered by 2630mAh nonremovable battery and this device has 8MP of front and 8mp of back camera.
Bypass FRP Files not responsible for any damage on your device please try this at your own risk.
Download Nokia 3 FRP File and Tool
- The following guide is only for Nokia 3, so don’t try this with any other devices.
- Charge your device at least 80% or above.
- A stable wifi internet connection.
- Take a full backup of your Android device.
- Follow all the below steps very carefully, don’t skip any step.
- Read More: MTK FRP Bypass Tool
How to Nokia 3 FRP Bypass with SP Flash Tool
- First, Download & extract the Nokia 3 TA-1032 FRP File and FRP Tool from the download section.
- There you will see “2” files.
- SP Flash tool.zip.
- FRP Files folder.
- Extract the SP Flash tool.
- Run SP Flash tool.exe
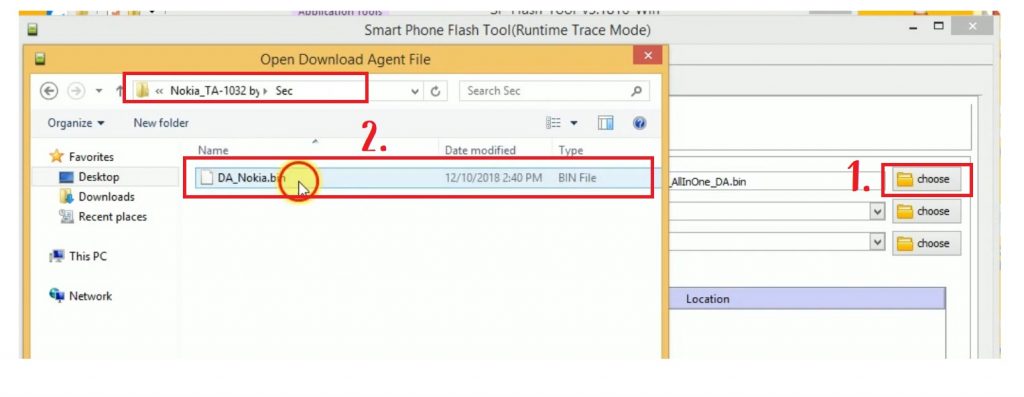
- Click on the Download-Agent tab, and give the file path of Download Agent file (you can find it on the Nokia 3 TA-1032 FRP File folder)
- Then press open.
Read More: Lava Z61 FRP Bypass
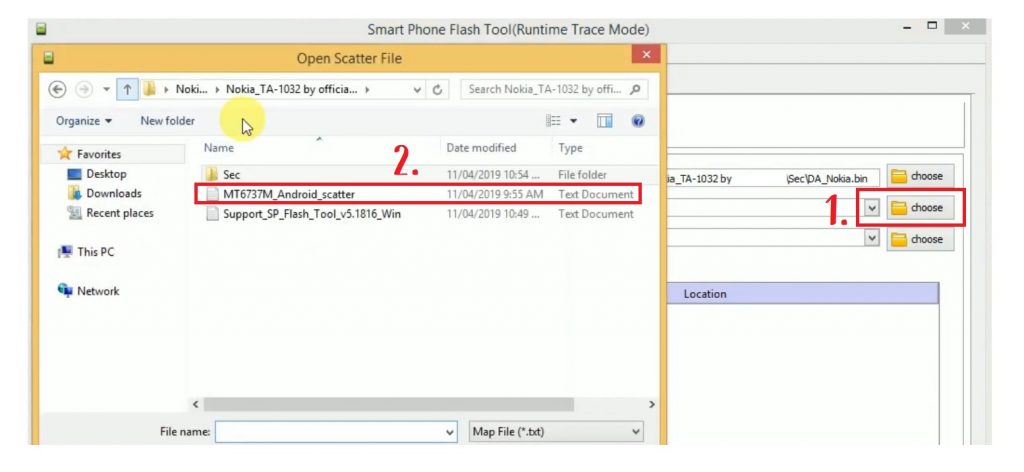
- Click choose from the Scatter-loading, and give the file path of Nokia 3 MTK Scatter file (File should be in the FRP file) folder and press Open.
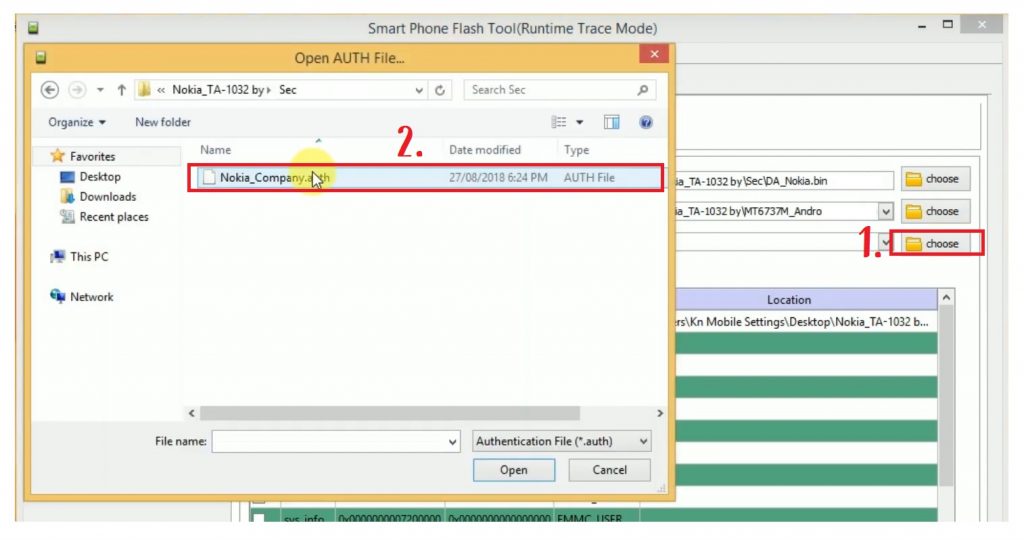
- Last part, Click choose from the Authentication-File tab, and choose Nokia_company.auth (File should be in the FRP file folder) and press open.
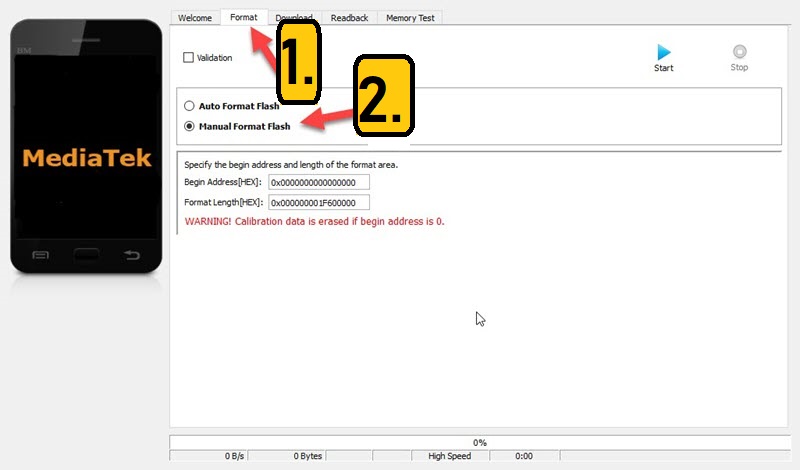
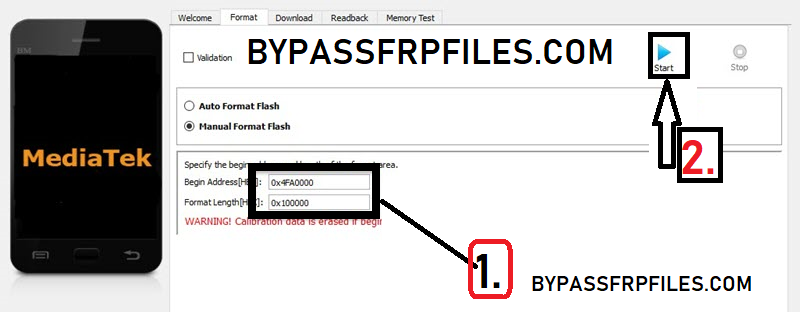
- Click “Format”.
- Select Manual Format Flash.
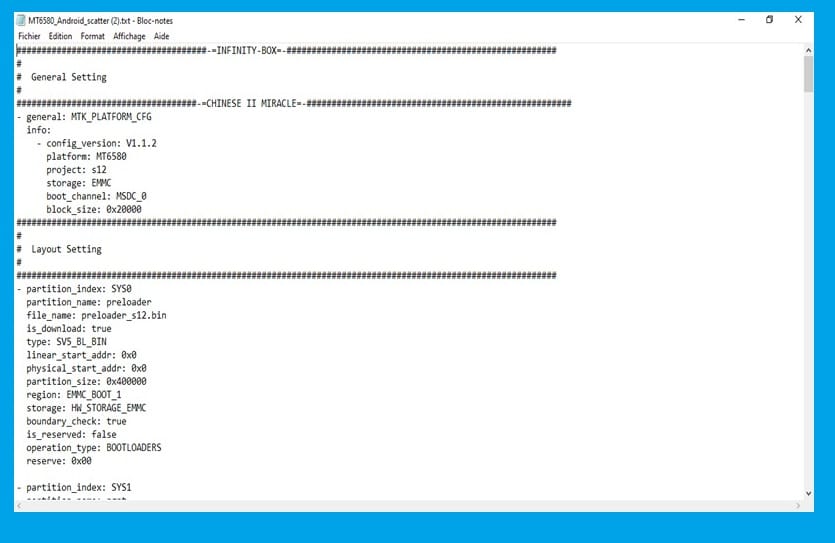
- Right click and Open Nokia 3 MTK Scatter file.txt file in notepad.
Begin Address[HEX]:0x9B20000
Format Length[HEX]:0x100000
- Open the notepad and press CTRL+F at the same time to open the Find option.
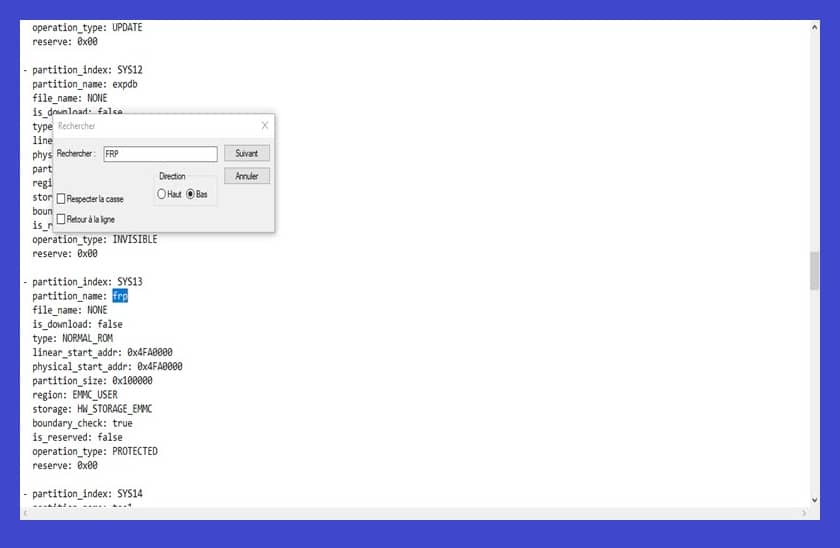
- After that, find the keyword “FRP” there.
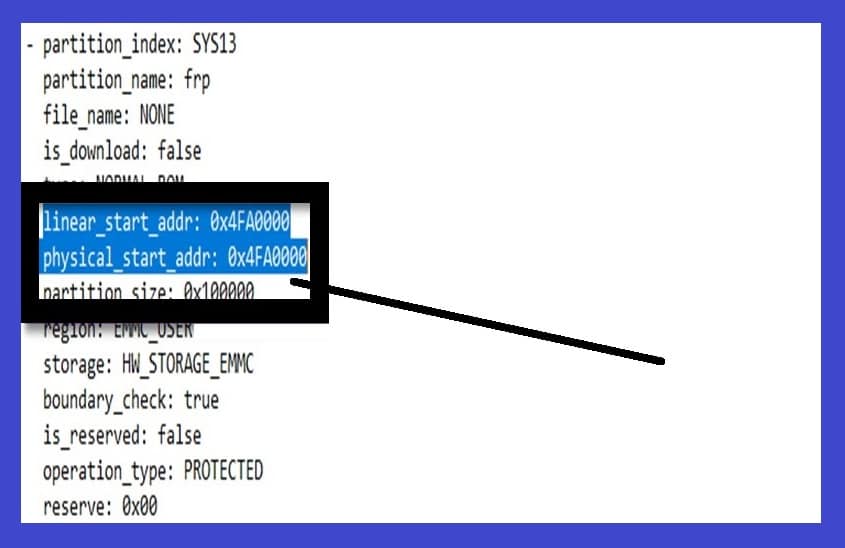
- Now open the SP Flash Tool and replace the Begin Address and Format Length value with the Nokia 3 (TA-1032) FRP file Scatter text FRP value.
- Just copy the Linear_start_address value & paste it in the SP Flash Tool Begin Address field. and Copy the Partition_size value & paste it in the Format Length field.
- All files are now successfully selected, now format the FRP storage.
Make Sure:– Install the MTK USB Driver on your computer before connect your phone to the computer.
- Click Start.
- Now Connect your Device.
- First, Power Off your Device.
- Connect your device to the computer using a good USB cable.
- Check the SP Flash Tool a green line will appear.
- Flashing started, wait for finish.
Note:- If your Nokia 3 not detected on the SP Flash Tool, Reinstall the USB Driver and follow the whole process again.
- Once flashing finished, you will get a pop-up window.
- Disconnect and power on your phone.
- Great, you have successfully unlock FRP Nokia 3.
This is the simplest way to Nokia 3 FRP Bypass | Unlock Google Account – FRP File (Android 9).
Also Read: Download Power GSM FRP Unlock Tool for All Android FRP Bypass
If you still stuck between some steps or could not understand anything relating to this topic, you can let me know in the comment section below. Thanks for visiting.