![Asus Zenfone 3 Max FRP Bypass Android 7.0 – Unlock Google Gmail Lock [Without PC] [Fix Location & Youtube Update]](https://bypassfrpfiles.com/wp-content/uploads/2021/07/Asus-Zenfone-3-Max-FRP.jpg)
FRP is an inbuilt data protection feature for all present-day Android smartphones, It protects phones from unauthorized access. After performing a factory reset, If you forget the last active Gmail account which was used on your phone, then, you have to find a solution to unlock your phone. Here, more especially, I share a detailed process to Asus Zenfone 3 Max LTE FRP Bypass Android 7.0 – Unlock Google Gmail Lock Without PC/APK [Fix Youtube Update] (New Security Patch) successfully. So, follow the below process carefully.
Google provides the new FRP feature on Android Lollipop, Marshmallow, Nougat, Pie, Oreo, and 10 Q versions. The summarization of factory reset protection is FRP and it basically protects Android users’ personal data and Privacy during thefts. The process of unlocking FRP security has different with every new Android version and phone. So, always remember the Gmail account information to avoid FRP protection lock.
The FRP turns On automatically when you have setup a Google Account on your Asus Zenfone 3 Max Phone. After Reset your phone without removing the Google Account, you have to log in with the same Google ID and password that you set up earlier on the device to bypass Google account verification lock on your Asus Zenfone 3 Max.
In case, your device stuck at the FRP lock verification screen and you have forgotten the account information, Then these simple step-by-step instructions will help you to bypass google account lock from your device.
The Asus Zenfone 3 Max FRP Unlock process has become very challenging, Also you can use any compatible FRP bypass tool & FRP Bypass APK according to your phone to unlock FRP, and here I share the latest FRP Bypass process to bypass FRP lock from your device.
How To Disable Factory Reset Protection
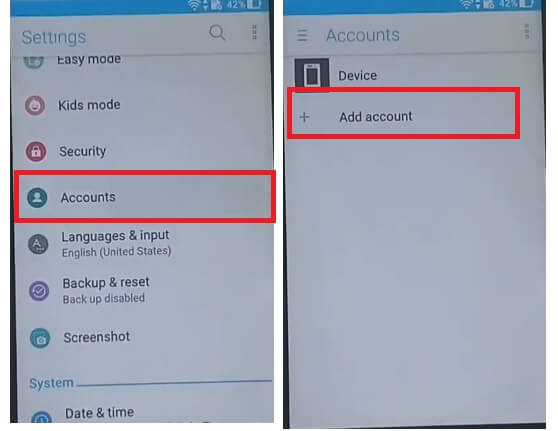
If you want to disable the FRP lock feature from your Asus Zenfone 3 Max then you need to delete the Gmail Account from the device Settings. follow the below process completely to disable the Factory Reset Protection successfully: go to the settings menu=>> Accounts=>> select the Gmail id =>> remove account =>> that’s it.
Bypass FRP Files not responsible for any damage on your device please try this at your own risk.
More: Qualcomm Unlock Tool Latest FRP/Pattern Remove Tool Free Download
How to Asus Zenfone 3 Max FRP Bypass/Unlock Android 7
- First, Switch on your Asus Zenfone 3 Max.
- Tap Next and Tap Skip.

- Connect your Asus phone to a WiFi network
- Go back to the first Welcome screen
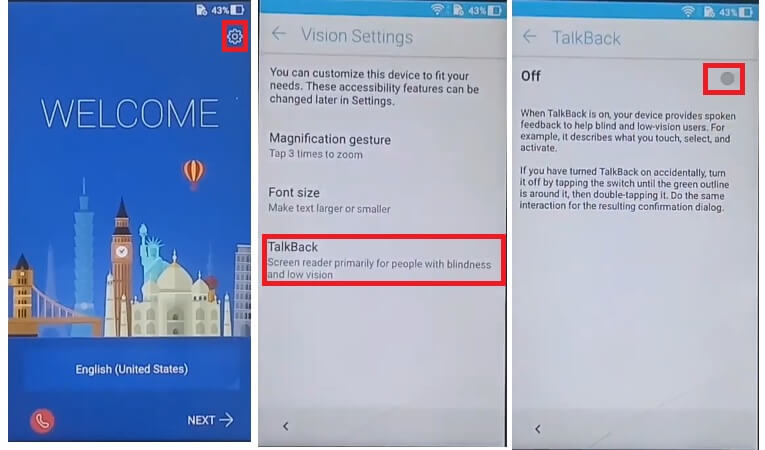
- Tap Settings on the top-right corner.
- Select Talkback and Enable it
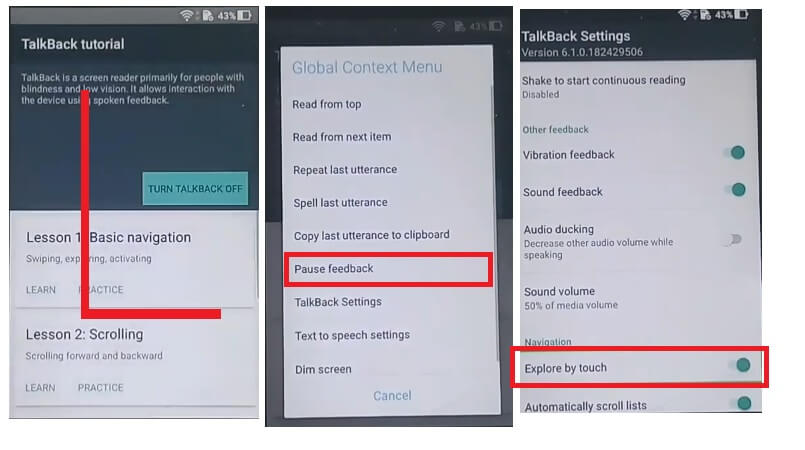
- Draw “L” on your TalkBack tutorial screen to bring “Global Context Menu”.
- Draw “L” again and double tap to select Talkback Settings
- Then use your two finger to go down and select =>> Explore by touch
- Suspend TalkBack => OK
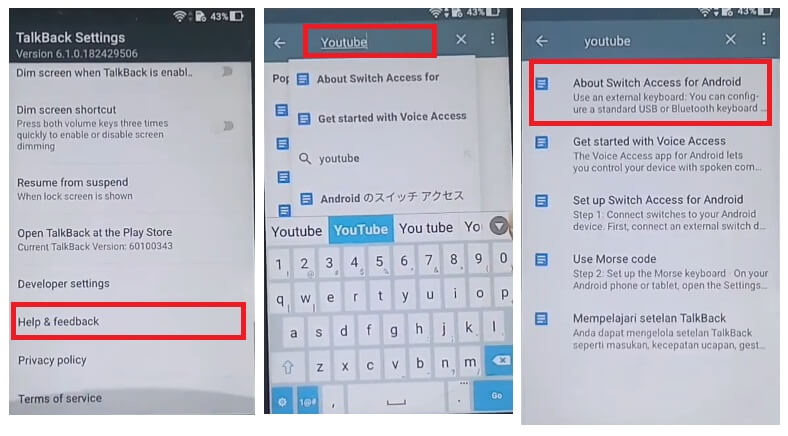
- Go down, select Help & Feedback
- Type and Search: Youtube
- Select About Switch Access for Android
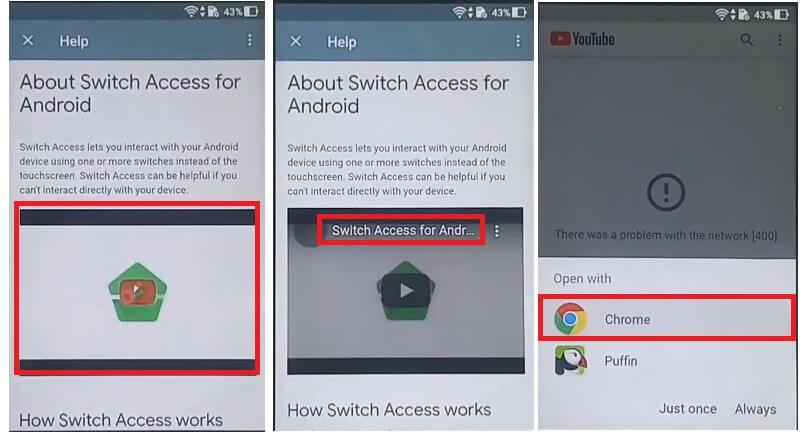
- Now you will get a Youtube video, Play it
- Tap on the Video title
- It will lead you to the Youtube App
- Select Chrome to Open it
- Now tap on the search bar
- Search any one of these two belowq URLs:
- Download these two below listed applications
- Gadgets Doctor.apk
- Apex Laucher.apk
- Tap on “3dots” and Select Downloads
- Install Apex Launcher.apk => Open
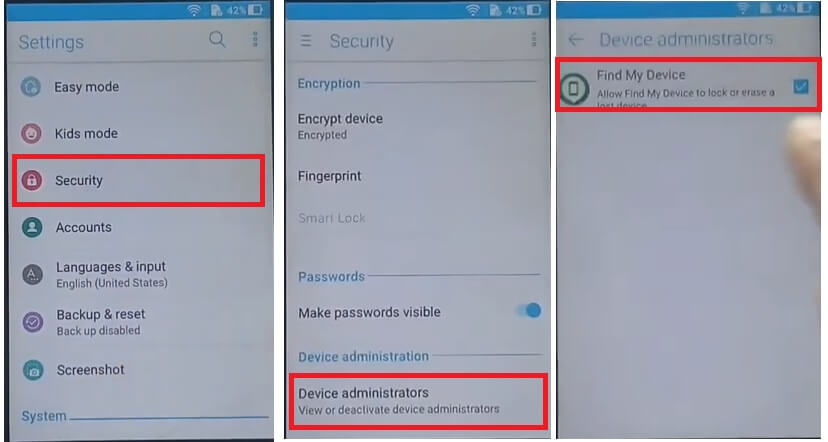
- Go to Settings =>> Security => Device Administrators =>> Device Administrators
- Deactivate the Android Device Manager
- Go back to the Settings home
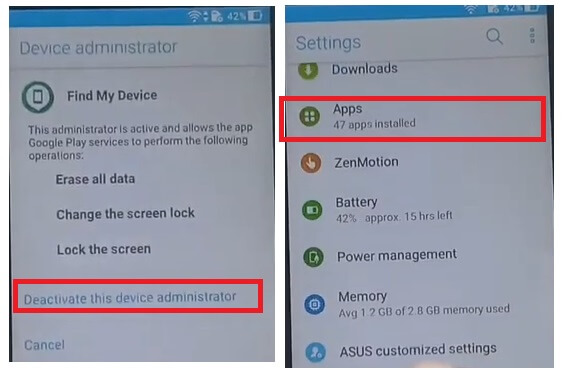
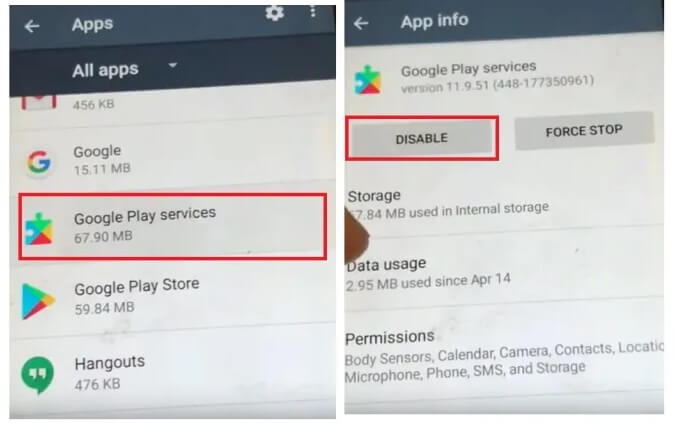
- Open Apps
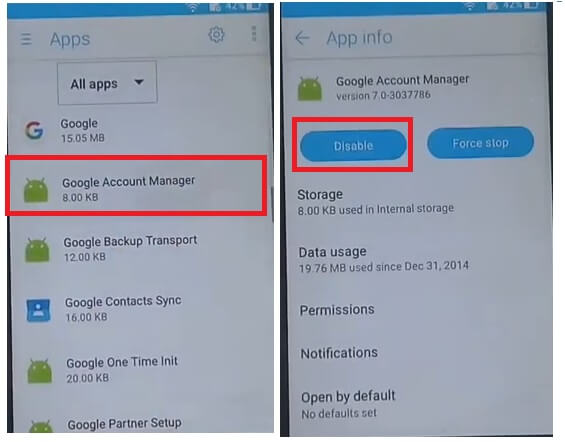
- Disable Google Play Services & Google Account Manager
- Now Open My Files

- Install Gadgets Doctor.apk =>> Tap Done
- Open Settings =>> Accounts =>>

- Google =>> Add GMAIL account now.
- Now go to the Apps and enable =>> Google Play Services & Google Account Manager.
- Back to the Settings main menu => Open Security => Device Admin Apps => Enable both device manager.
- Restart your Asus Zenfone 3 Max now.
- Setup your phone.
- That’s it.
Read More: Asus Zenfone 4 Selfie FRP Bypass – Unlock Google Verification (Android 8.0 Pie)- Without PC